Showing posts with label Autumn Crafts. Show all posts

Friday, November 9, 2012

The Hand-Turkey Tablecloth

It is time, once again, for the annual hand-turkey. Every year, since 2003, Blaze has made a new hand-turkey on this tablecloth, so that this little parade of turkeys represents him growing up.

  Photobucket

Every year, he complains that the fabric paint tickles. Photobucket

 This year's hand-turkey:
 Photobucket

 His hand seems considerably bigger this year than last. Photobucket

Wednesday, November 7, 2012

Autumn Colors Centerpiece


Using some tissue paper, some Mod Podge, and a cleaned out jar that had once held spaghetti sauce,  Blaze made a candle holder for our Thanksgiving table.

Photobucket

The Mod Podge was painted all over the glass and colored tissue paper was stuck to it. Then another layer of Mod Podge was painted over the top of the tissue paper.

Photobucket

After drying overnight, I added some jute twine (left over from gardening) around the top, because I like the natural/rustic way it looks. We set the jar in the middle of a wooden plate and took a walk to find autumnal looking things in nature that we could place around the jar.

Photobucket

A small pillar candle fit nicely into the jar.

Photobucket


Monday, October 22, 2012

Ornaments for a Halloween Tree

Last week, Blaze made Halloween ornaments out of  "Model Magic", a very lightweight, spongy modeling material. One package of the "Model Magic" made several ornament.

Photobucket

Photobucket

Most of the ornament shapes were made using cookie cutters or candy mold, but the one I liked the best was a Blaze original.

Blaze says the one in the middle is Ghost Elvis:

Photobucket

Photobucket

Today, we made a glittery spider tree topper out of a styrofoam ball.

Blaze covered the entire ball with liquid "school glue"

Photobucket

Then we covered the ball, some ornaments, ourselves, and everything else with black glitter.

Photobucket

The completed tree in Blaze's room:

Photobucket


Tuesday, November 24, 2009

The Annual Hand Turkey

It is that time again. The time of year when I get to slather Blaze's left hand with fabric paint and add a new hand-turkey to our Thanksgiving table cloth.

Photobucket


Here is this year's turkey:

Photobucket

This is our 7th year for this tradition, so we have a nice little parade of hand-turkeys running along the edge of the table cloth, each turkey just a little bigger than the one before it.

Photobucket

It's always fun to look at how much Blaze has grown:

Photobucket

When we started the tablecloth, in 2003, I also made a Thanksgiving T-shirt for myself with DH and I adding our handprints to Blaze's.

Photobucket

Photobucket

Tuesday, September 22, 2009

Happy First Day of Autumn !

Photobucket


Autumn Fire

by Robert Louis Stevenson

In the other gardens
And all up the vale,
From the autumn bonfires
See the smoke trail!

Pleasant summer over
And all the summer flowers,
The red fire blazes,
The grey smoke towers.

Sing a song of seasons!
Something bright in all!
Flowers in the summer,
Fires in the fall!


Photobucket

Photobucket


"Come said the wind to
the leaves one day,
Come o're the meadows
and we will play.
Put on your dresses
scarlet and gold,
For summer is gone
and the days grow cold."
- A Children's Song of the 1880's


Blaze and I found just enough pretty colored leaves to make an Autumn crown, which we took turns wearing, and to make two leaf pictures to hang above our nature table.

Photobucket

Photobucket


Our Autumn Nature Table:

Photobucket


We also read the book, The Magic School Bus, The Wild Leaf Ride

Photobucket

Friday, September 18, 2009

Felted Fall Leaves

Blaze and I spent a couple days this week working on a little Autumn tree for our nature table. We started with a small clay flower pot that we filled with air drying clay.

Photobucket

Then Blaze stuck a dead tree branch into the clay, so it looked like a little tree.

Photobucket

We then made wet-felted Fall leaves, using some beautiful multi-color wool roving and small leaf shaped cookie cutters.

Photobucket

Each cookie cutter was filled with the fluffy wool and then squirted with a bit of dish soap. Then hot water was drizzled over the yarn (just enough to get it thoroughly wet, but not enough to make it float).
Blaze started out, gently poking the wool down and into all the curves and corners of the cookie cutters with a knitting needle. Then as the water cooled down and the felting started to happen, he was able to use his fingers, as well as the knitting needle, to poke at the wool.

Photobucket

Photobucket

It took about 15 minutes of rubbing and poking to get the wool to stay together in a satisfactory way. We then gently rinsed each leaf while it remained in it's cookie cutter, pressed the water out the best we could with our fingers, and carefully removed the "leaf" from the cookie cutter onto a folded towel. The "leaves" were then left to dry over night.

The next day, we used some orange embroidery floss to make loops, threaded though the "stem" of each leaf, and hung the leaves on the little tree.

Photobucket

Photobucket

While Blaze was busy making tiny wool leaves, I made three larger ones, using a bigger size cookie cutter.

Photobucket

Photobucket

The larger ones are to use as coasters.

Photobucket

Wednesday, September 2, 2009

The First Projects for Our Autumn Nature Table

It will not officially be Autumn until Sept. 22, but this week we began making things for our Autumn nature table. Our first project was making a woven place mat out of sugar cane leaves, which will be the base of our display.

The sugar cane is a perennial in the student gardens, but it has grown much more sparsely this year than it did last year, maybe because last winter had so many days below freezing. This is really not the ideal climate for sugar cane, so we are lucky it grows here at all.

Photobucket

Blaze and I cut several of the largest leaves off the sugar cane. I used a place mat we already had, as a way of measuring the leaves the proper size (many of the leaves were long enough to make two lengths of warp or weft ). After doing a small amount of weaving, I found it helpful to use some tape to hold the finished edge in place.

Photobucket


Photobucket

It really was a joint project. Blaze did much of the weaving, but I cut the leaves and used the sewing machine to sew around the edges after the weaving was done. The sewing seemed easier in theory than it turned out to be in practice. No matter how hard I tried, I couldn't sew a straight line, but it isn't that noticeable on the finished mat, unless you know what you're looking for.

Photobucket

Heavy books had to be set on the corners of the mat to keep them from curling up as the leaves dried.


After making the modeling beeswax last week, I really wanted more Autumn colors, so I tried using tea bags of black tea to make a brown color, but that failed. There was no noticeable change in color. Next, I tried freshly ground coffee, but that only slightly tinted the wax, in a way that would only be noticed if you had some uncolored wax with which to compare it. That was when I gave up trying to find a natural dye in my kitchen and instead broke one of the brown block beeswax crayons in half and added it to the re-melted modeling beeswax. That made a wonderful brown color. This picture doesn't really do it justice. The finished wax looks so much like milk chocolate that my husband says he keeps wanting to eat it.

Photobucket

Blaze used the modeling beeswax and a couple small cookie cutters to decorate a pillar candle, while I glued some small pine cones and Sweet Gum Tree "Gum Balls" around a circular piece of wood to make a candle holder.

Photobucket

Photobucket


Modeling Beeswax Recipe

Friday, August 28, 2009

Narurally Colored Modeling Beeswax

I really like the modeling beeswax that is sold by Waldorf art supply sources. It smells wonderful ( I can't stand the smell of Play-Do), is easy to clean up, and can be used over and over. The only drawback is the price, so last night I made my own. So far, I only have 3 colors, but it's a good size supply and it only cost about $7 to make.


Modeling Beeswax Recipe

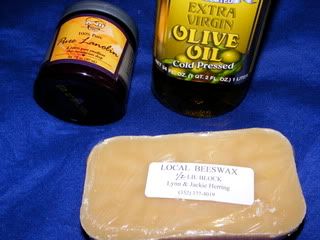
4 ounces of beeswax
1 teaspoon Lanolin
1 Tablespoon Olive Oil
Photobucket

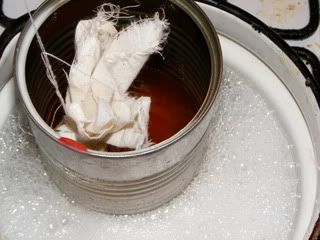
Melt the wax, lanolin, and oil in a double boiler. A clean soup can, sitting in a small pan of water, works well for this and is just the right size.
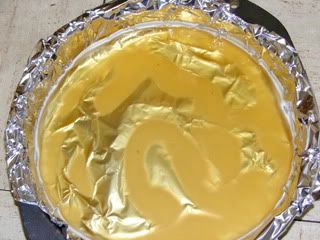
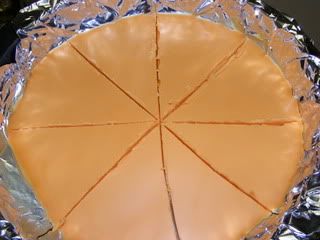
Use a wooden skewer or popsicle stick to stir the mixture while it melts. For a natural beeswax color, nothing more needs to be added. Just continue stirring while pouring the mixture into a foil lined cake pan or pie plate ( the foil is optional, but it makes clean-up easier).
Photobucket

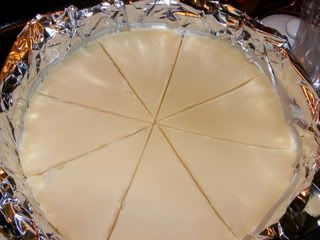
Let the wax cool for about a half hour, cut into wedges, and remove from pan.
Photobucket

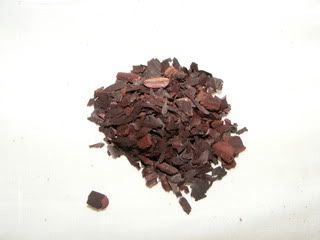
For red wax, place 2 teaspoons of alkanet root in a small piece of muslin or cheese cloth and tie the bundle closed with a long string. Holding onto the string, lower the cloth bundle down into the hot wax mixture right after it is all melted.
Photobucket

Leave the wax mixture on the heat for another 5 minutes, stirring constantly.
Photobucket

Carefully remove the cloth bundle before pouring. I found it easiest to use a pot holder and carry the hot soup can over to the trash can to remove the alkanet bundle, because it was dripping hot red wax.

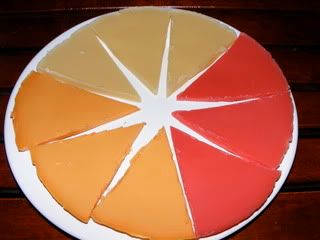
For orange wax, I remelted half of the batch of natural color and half of the batch of red and added a little cloth bundle with a 1/2 teaspoon of turmeric, following the same directions as for the alkanet root.
Photobucket

These are all good colors to go with the upcoming Fall season.
Photobucket

Photobucket

Modeling Beeswax is not only a good play-do substitute, it is also good for decorating candles. The wax will stick to other wax just by pressing.

Crafty Crow