Showing posts with label Toys. Show all posts

Wednesday, September 21, 2011

A Dynamite Toy Storage Idea

We are still trying to find ways to replace all the black plastic cauldrons that we have been using for toy storage in Blaze's room (left over from the Harry Potter theme that no longer exists). DH found this antique dynamite case (circa 1910-1930) on eBay.

Photobucket

Photobucket

Photobucket

We cleaned the box really well and I even sanded the inside a little. Then DH made some beeswax furniture finish and rubbed it into the wood.

Photobucket

The beeswax finish is made by mixing 1 part melted beeswax (use a double boiler) and 6 parts mineral oil. It should have a consistency similar to Vaseline. It can be stored in a sealed container for several months, without refrigeration. It is also edible, so it can be used to treat wooden bowls and platters.

We decided to use the dynamite box for the Lincoln Logs, because they were the most dynamite shaped toys Blaze has.

The wood finish really brightened up the color of the wood.
Photobucket

Saturday, December 4, 2010

Model Trains at the Matheson

Yesterday afternoon, Blaze and I went to our local history museum for the first time, so we could see a small show of model trains. The trains will be on display today and tomorrow, as well.

Photobucket

Photobucket

Photobucket

Photobucket

Although some of the local history displays had been moved out of the way to make room for the trains, there were still some non-train related things that I thought were interesting to look at,

Photobucket

Photobucket

but Blaze had eyes only for the trains, and I was not even able to read the complete passage under this diorama to him before he ran off, back to the largest train table.

Photobucket

As we were leaving, one of the model train operators stopped Blaze and gave him two old copies of Model Railroader Magazine. He was very excited and informed me that as soon as we got to the car, he was going to start studying these.

Photobucket

For more information about the Matheson Museum, the website can be found here:

http://www.mathesonmuseum.org/

Thursday, March 5, 2009

King Equals Meets the Math Gnomes

It was time to introduce King Equals to the math gnomes, but he's supposed to be dressed all in royal purple and I didn't have any purple felt and didn't feel like waiting for a piece of mail-ordered felt to arrive. The solution was to make it myself. I used the last of the blue acid dye powder from the tie dyed t-shirt we made two weeks ago and mixed it with packages of unsweetened cherry Kool-aid. I don't think I could reproduce this process again it I tried, but it did work.

Photobucket

I dyed some wool roving and then used the instructions from The Art of Feltmaking, by Anne Einset Vickrey, for making flat felt in a plastic bag.


Photobucket


Photobucket

Photobucket


Here are more useful links for math gnome stories:

http://waldorfjourney.typepad.com/a_journey_through_waldorf/2008/07/the-four-proces.html


http://www.oakmeadow.com/curriculum/overviews/1_Web_Overview.pdf

Monday, March 2, 2009

Unplugged Challenge: Bottle

Ocean in a bottle:

We have been learning all about Lewis and Clark trying to find a NorthWest passage to the Pacific Ocean, so for this week's unplugged challenge theme of "bottle", we created an ocean in a bottle.

We started off with an empty 2 liter soda bottle.

Photobucket

Blaze put some small shells into the bottle and I added some clear glitter.

Photobucket

Photobucket

Then we filled the bottle half full of water and added a little blue food coloring.

Photobucket

Photobucket


Next, we filled the bottle the rest of the way to the top with baby oil and glued the lid on the bottle using strong waterproof glue.

Photobucket

When the glue was dry, we were able to turn the bottle on it's side and make waves by rocking it back and forth.


This works because oil and water don't mix.


Don't forget to check out the other "bottle" projects at Unplug Your Kids

Saturday, February 28, 2009

Math Gnomes

Photobucket

These were the inspiration for this week's posts about peg dolls. I spent a couple evenings this week working on a set of math gnomes for Blaze, using the 2-3/8" wooden peg dolls. Then we read the first story from the following blog:

The math gnomes and the story were a big hit with Blaze! He had already worked on his regular math lesson in the Math-U-See workbook, but he didn't think of the gnomes as another math lesson, he thought of them as a game, as we tried to act out the story while I read.

When I explained to my oldest daughter, Ula, about how the math gnomes introduce all four math processes at once, she said something along the lines of, "Well, it will be a while before he gets to division", but this is not actually the case, because I gave Blaze 10 of the glass aquarium "jewels" that are used as the gnomes' treasure, and he was able to split them up equally between two tiny baskets, so he is already doing division.

Photobucket

Photobucket

Here's the first lesson Blaze did with the Math Gnomes:

Photobucket

He is enjoying this chapter of the Math-U-See Alpha book, as well. It is using a story, of sorts, to teach adding with 9. The story is that 9 very badly wants to be a 10, so every time another number is added to it, it turns on it's vacuum cleaner (children are encouraged to make a sucking noise at this point) and it sucks up one unit and turns into a 10. Each problem on the workbook page is acted out using blocks.

Friday, February 27, 2009

Tiny Wooden Babies

For the bendy doll's babies, I use the smallest size of the little wooden game piece people. For the most part, these are just wrapped in a "blanket" that is glued to the doll body. For example the babies from the set of cave people:

Photobucket


For the pirate baby, though, I drilled a hole through the upper body for arms and through the lower body for legs. I did not bother wrapping either the arm or leg pipe-stem cleaners with embroidery floss, since both would be covered with a little wool stuffing and the pajamas. I also drilled a hole in the top of the head, so I could glue in a single curl of mohair.

Photobucket


A wet felted baby bunting ( DH says it looks like a mummified toe) :

Photobucket

Photobucket

Note the rubber gloves. This was my important lesson from making that wet felted pouch the other day. After doing that without gloves on, my hands were so dry and peely for the next two days, that Blaze looked at them and told me I was getting old.


Photobucket


More little peg people tomorrow...

Thursday, February 26, 2009

Game Piece Dolls

Last year, when we were renting a house, I had started doing some wooden toy making. It was something I was really enjoying and would like to continue doing, but now that we live in an apartment, I have fewer opportunities to use power tools and make messes with sanding dust.
I haven't made any bendy dolls in a while because I like mine to have sturdy wooden bodies and wooden feet that allow them to stand by themselves, but I have been doing more with the little game piece men that are sold in the unfinished wood area of the craft store.

Photobucket

These are very versatile and don't require any sanding. I have added arms to some of them by drilling a hole through the upper body and cutting a pipe stem cleaner in half, then wrapping it with embroidery floss, the same as for the bendy dolls, but this is not necessary.


Photobucket

This little daisy girl was made using a pattern in the book Feltcraft, by Petra Berger. This book is a great resource if you want to make small toys.

Photobucket

The boy with the acorn cap and the astronaut were made without any patterns. Making dolls this way can be as easy as just painting clothes on the game piece and drawing on a face.


Photobucket

Photobucket


This topic to be continued...

Wednesday, February 25, 2009

My first wet felting project

I made a pouch to hold a set of marbles for Blaze.


I started by wrapping a mason jar with wool roving, to get the size and shape I wanted for the bag. DH teased me a little about the "snuggy" I was making for the canning jar.

Photobucket


Then I covered the wool with lots of dish soap and a little hot water. I started working the wool with my fingers and then used Blaze's little washboard. When the wool had started felting, I removed it from the jar and put it on my hand like a mitten, so I could have more control while I continued rubbing it on the washboard.

Photobucket


Photobucket

Next, I turned the pouch inside-out and continued rubbing it against the washboard.


Photobucket

I rolled the pouch up in a towel to get out as much moisture as possible and then let it dry overnight.

In the morning, I punched holes in the felt, and threaded a piece of yarn through, to be a draw string.

By the time Blaze woke up, the marbles were in the bag.

He loved his surprise!


Photobucket


Photobucket

We looked at some pictures of marble mazes on the internet and Blaze spent a couple hours last night building his own marble tracks out of blocks and the wooden train set.

Friday, January 16, 2009

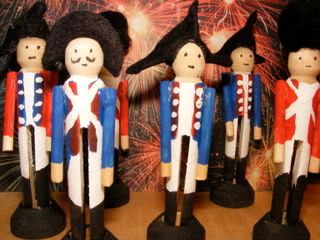
The March of the Toy Soldiers

Photobucket

Our big project this week has been making a set of toy soldiers.

Since we've been learning about the Revolution, Blaze has been talking a lot about the "Red Coats" coming, and I thought he'd like to have some Revolutionary War toy soldiers to play with. I had hoped to find some at Colonial Williamsburg, but had no luck. I couldn't even find any on-line (I'm picky and wanted wood. I also wanted them to be taller than one inch), so we are making our own.
If you would like to try this project, this is how we are doing it (they aren't all done yet).
Photobucket

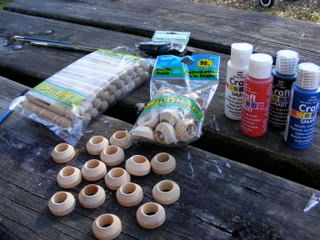
Supplies:

One package of "Doll Pins", clothes pins sold at the craft store for the purpose of making dolls (the regular clothes pins we had were too thin for the bases)

One package of Doll Pin Stands, sold next to the doll pins at the craft store

Non-Toxic acrylic paint in dark blue, red, white, and black

Two 3/16-inch dowels cut into 1 1/2- inch pieces (I was able to do that with a pair of scissors)

strong, clear-drying glue

small paint brushes

black wool felt and black 1-inch pom poms for the hats

black permanent marker, for the faces


1. Glue the clothes pin into the wooden base, so it can stand up on its own.

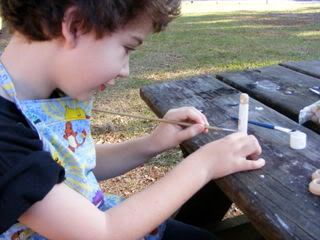
2. Using the white paint, paint around the clothes pin, from the bottom of the "neck" to half-way down the "legs". This will be the shirt and pants.Let the paint dry before proceeding to step 3.
Photobucket

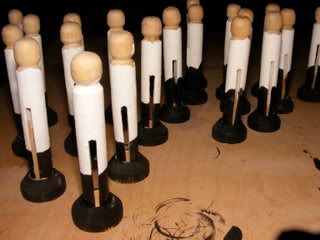
3. Using the black paint, cover the base and half-way up the "leg", until the black touches the white paint, leaving no bare wood showing on the "legs". This will be the boots. I painted the boots a little taller on the half of the clothes pins that will be British soldiers and made them more rounded at the top.
Photobucket

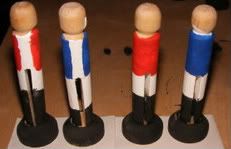
4. Paint on the jackets.

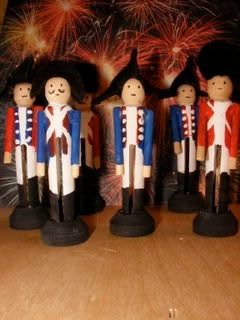
In our set there will be 10 British soldiers with red jackets and 10 American soldiers with blue jackets.
Photobucket

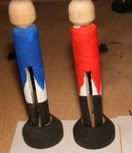
I painted the jackets on straight across the back first and then went back and added the points on each side of the back to make the "shallow tails" that were the fashion at the time.
Photobucket

5. Add any decorative touches to the uniforms.
We added lapels of contrasting color and white buttons to some. Others got crossed white straps.

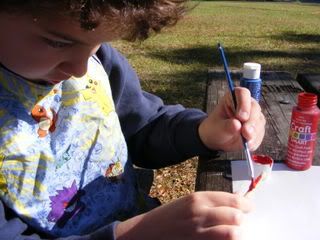
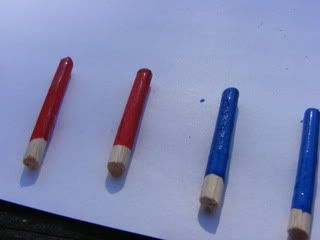
6. For the arms, sand any rough pieces off the ends of the 1 1/2 inch dowel pieces and paint two for each soldier, leaving the tip you are holding bare. The unpainted tip will be the hand. After the arm is dry, glue it to the body and let it dry over night.
Photobucket

Photobucket

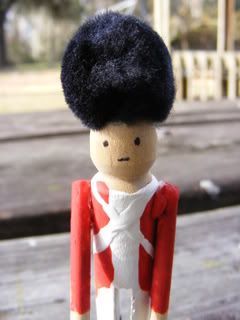
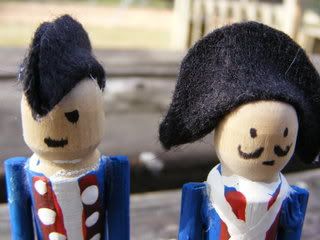
7. The hats can be a variety of shapes. The easiest for the British soldiers is just a 1-inch black pom pom glued to the top of the head. The tri-corner hat is a small triangle of black felt. The other hats are made with a small circle of felt that is folded over and glued together.
Photobucket

Photobucket

8. Draw eyes and mouth with a permanent marker.

Ready to march:
Photobucket

Crafty Crow