Wednesday, September 26, 2012

Steampunk Picture Day

When Ula and I had been discussing the latest chapter of the airship pirate story that she had written for Blaze, we had talked about how the garden party itself should be the next chapter.  If you would like to see the last addition to the story, it can be found here: http://overthecrescentmoon.blogspot.com/2012/07/the-story-of-the.html

The idea of Blaze at a garden party inspired this year's steampunk photo shoot.


"The food is good, but the company is kind of dull. I should see what I can do to liven up this party."
Photobucket


"I know a few parlor tricks to entertain our guests."
Photobucket

"Of course I wouldn't really light it here...or would I?"
Photobucket

"It's getting late. Why don't these people take a hint and go home? Subtlety is obviously wasted here.
Maybe this will help."
Photobucket

"Neriena is going to kill me, isn't she?"
Photobucket

"Well, I'm going to finish my tea, at least."
Screenshot2012-09-26at33008PM

"Hey, Captain! Wasn't that fun?! I tested the new Tesla cannon on the roof and it works like a dream. I think the neighbors were really impressed!"
Screenshot2012-09-26at33713PM-1


A bonus picture:


DSCN9798-1


Saturday, September 22, 2012

The Tallahassee Museum

While DH was working a half-day today, Blaze and I went on a field trip to the Tallahassee museum. The museum is mostly outdoors and is a combination of local history, natural history, and zoo. The exhibits include "Old Florida", "Big Bend Farm", "Natural Florida", and "Wildlife Florida.

OldFlorida:

 Photobucket

The one room school house: Photobucket

Photobucket

Photobucket

Photobucket

Photobucket

Photobucket

Photobucket

Photobucket

    Big Bend Farm:

Photobucket

Photobucket

 Blaze explaining to me how much he likes sugar while standing in front of a patch of sugar cane: Photobucket

Cotton:

 Photobucket

Photobucket

Wild Florida:

 The temperature was very high today, so we saw lots of hot, tired animals. DSCN9679_zps9b312c5d

Photobucket

Photobucket

Blaze comparing the size of his hand to the size of a red wolf paw print: Photobucket

Photobucket

Photobucket

Photobucket

Photobucket

Photobucket Photobucket

 It took us about 3 1/2 hours to tour the whole museum/park and that included time for Blaze to play in the playground and a stop for drinks in the cafe. It was fun and I'm now looking forward to taking Blaze to the Halloween event at the museum, next month.


 P.S. There is also a zip line adventure course throughout the museum, up in the trees. It's an additional fee and neither of us are very fond of heights, so we didn't try this.

Wednesday, September 19, 2012

It Be Talk Like a Pirate Day, Mateys!

So, here be a little pirate history.


The most disgusting, yet completely bloodless, true pirate story I've ever heard (herd?):


Now, ye all be as smart as paint.


Monday, September 17, 2012

Cowboy Day

About the middle of last week, Blaze announced that we needed a holiday and that Monday (today) would be Cowboy Day. He reminded us about this all weekend. So...

Photobucket

This has not been an excuse to get out of school work. He's been doing all of that, too, but he's been doing it while dressed in his Tesla Ranger costume.

There have been cowboy activities too, though. We finished reading The Original Adventures of Hank the Cowdog and discovered that there are online games related to the book.

Photobucket

http://www.hankthecowdog.com/games

For art, Blaze colored a chain of paper cowboys to hang on the wall.

Photobucket

DSCF2004-10

For our lunch break, we watched the newest episode of Dr. Who, entitled "A Town Called Mercy", which is set in a wild West town


and ate a bento lunch with a cowboy theme, kind of East meets Wild West.

Photobucket

The lunch included a hardboiled egg, shaped like a sheriff's badge, seasoned black beans (a cowboy meal has to contain beans), a cowboy boot and hat, both made of sweet rice and colored with soy sauce, beef jerky, and a celery stick "cactus".

Wednesday, September 12, 2012

Drink Carrier Turned Into Art Supply Caddy

While I was working on the hatbox for Blaze yesterday, he was making a carrier for his art supplies.

I prefer doing messy art projects outside on a easily cleaned vinyl table cloth, but sometimes that means several trips carrying supplies. Hopefully, this carrier will make that job easier. It's also a good recycling project.

Photobucket

Photobucket

Blaze added some cool space stickers, after the paint was dry.

Photobucket

Ready for the next art project:

Photobucket

Tuesday, September 11, 2012

A Hatbox for Blaze

I wanted a hatbox to protect Blaze's hats during our move and found this one for $10 at Tuesday Morning.


It doesn't really look right sitting in his airship pirate theme bedroom, so over the past couple days, I've done something to fix that.

I cut out pictures from the pages we had already used on the Myke Amend calendar that hangs in the kitchen. I had been trying to think of a use for these pictures anyway, because they really are too cool to throw out at the end of the year. ( If you would like to look at or purchase the calendar for the coming year, it can be found here:
https://www.redbubble.com/people/insectsangels/calendars/8099467-airships-and-tentacles-steampulp-calendar?grid_pos=7&p=calendar&rbs=90b0e126-bc83-4562-ac90-c080fc36bd3e&ref=shop_grid ).


I attached the calendar art around the box using Modge Podge and coated the outside of the pictures with Modge Podge, as well.

I painted the lid with black, gloss acrylic paint. The black was chosen, because Blaze says that's his favorite color.


I added a strap, so the box could be carried more easily.


The holes for the strap are reinforced with metal eyelets.


Now, it fits in with it's surroundings.

Thursday, September 6, 2012

Pillar Candle Mold from a Beer Cozy

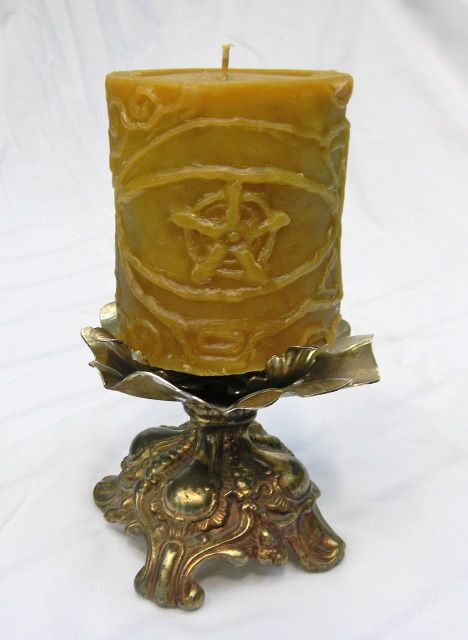
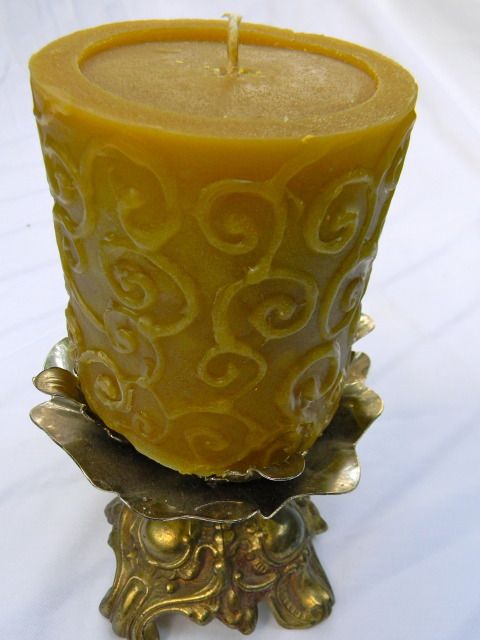
While unpacking kitchen supplies, I came across a couple beer cozies with bank advertisements on them. We have never used them for drinks, although back when Blaze's anti-seizure medicine used to come in liquid form, we had used them to protect the bottles from breakage if they were dropped. I realized that they were about the same size as short pillar candles and wondered if they could be used to make candle molds. It turns out they can.

Here is what you will need:

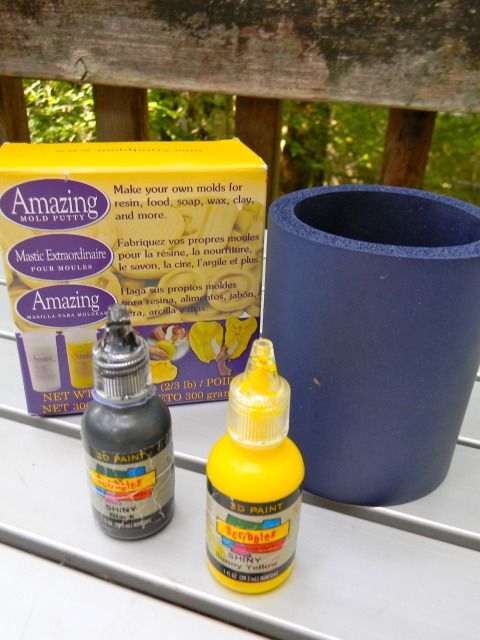
one foam beer/soda cozy

puffy paint (any color)

silicone molding putty (this took the entire box)

tooth pick

rolling pin

Photobucket

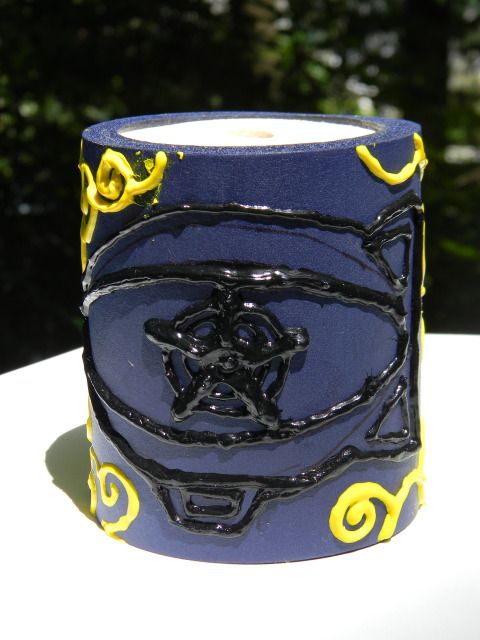
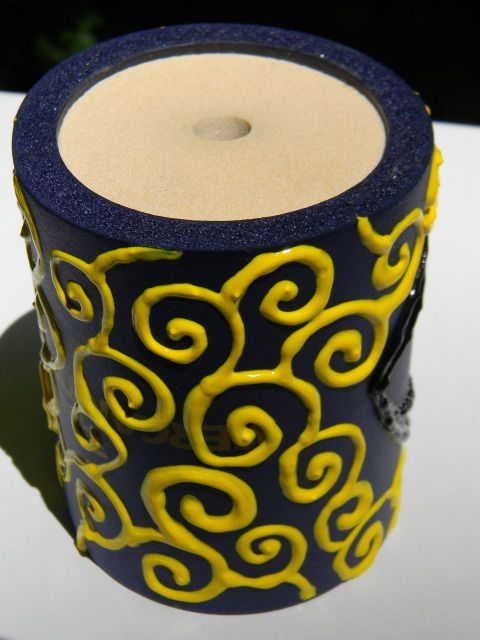
Turn the cozy upside down and decorate with the puffy paint. Let dry over night.

Photobucket

Photobucket

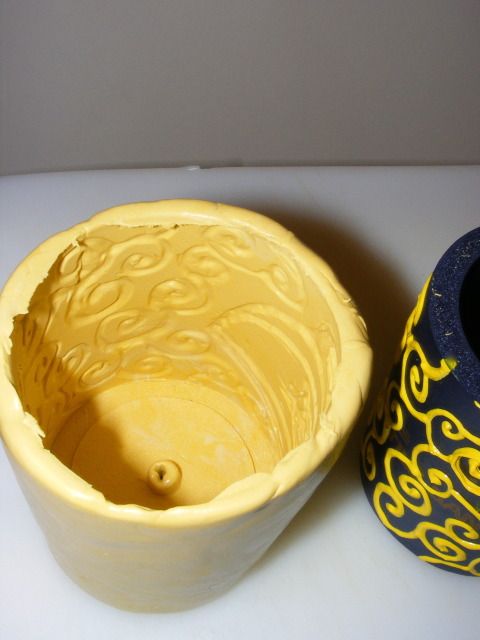
Follow the package directions for mixing the putty and use a rolling pin (I used a child-size one that Blaze has for play dough) to get the putty thin enough that it can be wrapped all the way around the sides and bottom (the end that is covered except for the small hole). This must be done quickly, because the putty will set up in about 20 minutes. Smooth the putty with your fingers and by rolling it on a flat surface. Use the tooth pick to poke a hole through the putty, into the hole in the cozy. This is where the wick will emerge from the finished candle.

Let sit for 30 minutes or so.

Gently remove the silicone mold from the cozy.

Photobucket

One of the nice things about the puffy paint on the foam surface, is that it can be peeled off. This means you can use the same cozy again for another design or correct mistakes in a design before the mold is made.


To make a candle with the mold:

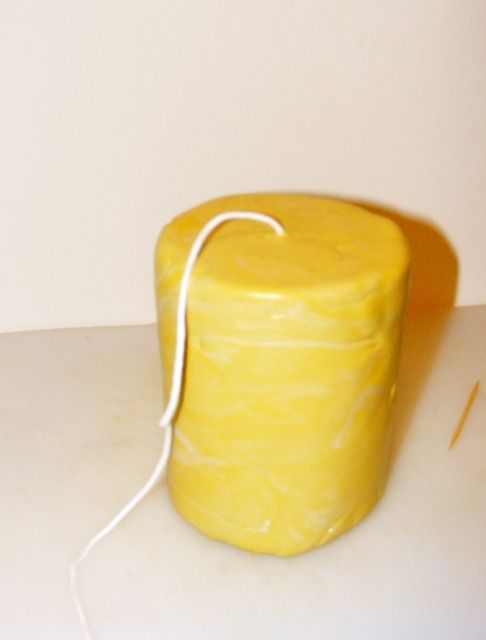
I found that it was easiest to use a tooth pick to poke the wick through the hole, working from the outside in.

Photobucket

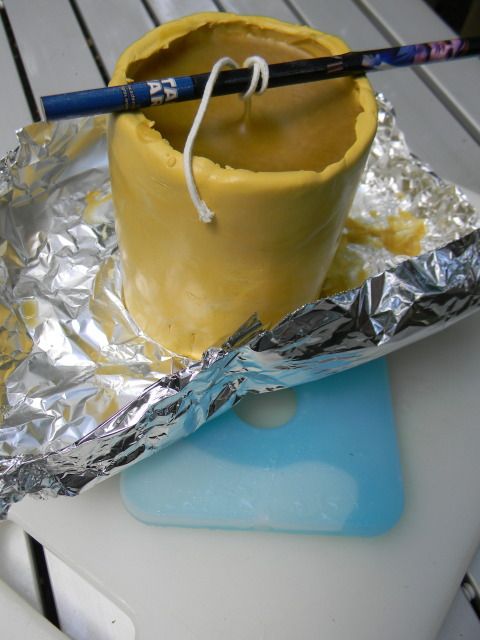
Not having anything except the wick to fill the little hole in the bottom of the mold, there will be some leakage, which is why I set the mold on a piece of aluminum foil with the edges turned up. I also added a flat freezer pack under the foil, because the quicker the wax cools and sets up, the less wax will drip out the bottom.

Photobucket

For this candle, I used a mixture of half beeswax and half paraffin, because I just happened to have both on hand, but either can be used alone. Melt wax in a double boiler and carefully pour into the mold, after the wick has been placed.

After 3 or 4 hours the candle should be set enough to remove from the mold. Loosen the edges gently and push from the bottom. Go slow so that none of the designs are broken or damaged. Trim the wick.

Photobucket

Photobucket


Crafty Crow