Tuesday, March 31, 2009

Chocolate Candies

   Blaze and I started making Easter candies last night. We're staring early this year so we can send some of them to my oldest daughter in her next college care package.

So far we have made butterflies out of pretzels, with licorice whip antennas and either dark chocolate or white chocolate bodies, and truffles.

Photobucket

Photobucket

Photobucket

Photobucket


Mocha Truffles


4 ounces of bittersweet chocolate

3 1/2 ounces marzipan (half a package)

2 Tablespoons strong warm coffee


Grind the bittersweet chocolate in a blender or food processor until it becomes a fine powder. Add the marzipan and blend until smooth. While the motor is running, add the coffee. Form the chocolate mixture into small egg shapes. These "eggs" can then be dipped in melted chocolate or just rolled in cocoa powder.

We made eggs out of the other half of the marzipan package, too, and dipped them in chocolate.

To tell the difference between the two kinds of chocolate eggs, we decorated the chocolate filled ones with a little melted white chocolate.

Photobucket

Photobucket


We'll probably be making more goodies this weekend.

Monday, March 30, 2009

More Johnny Appleseed

We are continuing to learn about Johnny Appleseed this week by reading the book Johnny Appleseed, by Reeve Lindbergh.

Photobucket

It turns out there is also a video interpretation of the book:


We are also reading How to make an Apple Pie and See the World (thanks Tammy for the book recommendation!). This book is about someone who wants to make an apple pie, but when she goes to buy the ingredients, she finds that the market is closed, so she sets off on a trip around the world to find all the supplies she needs.

Photobucket

To go along with these two books, Blaze did apple print designs on a canvas bag that we can take with to the grocery store, so we don't use so many disposable bags.

We cut two apples in half, one vertically and one horizontally, because a vertically cut apple makes a print that looks like an apple, while a horizontally cut apple makes a circular print with a star in the middle. We used half of each apple for the prints and ate the other half.

Photobucket

Photobucket


After the apple prints had all been made with red acrylic paint, Blaze used green paint and a thin paint brush to add stems on the prints that looked like apples.

Photobucket

Photobucket

Sunday, March 29, 2009

Egg candles

Here is another use for cleaned-out eggshells, egg shaped candles.
It's a little harder to get the egg out of the shell for these, because it helps not to have a bottom hole in the egg. I tried it with the blown eggs, by putting a piece of tape over the bottom hole to keep the wax from pouring out the bottom, but it didn't work. The hot wax came out around the edges of the tape.

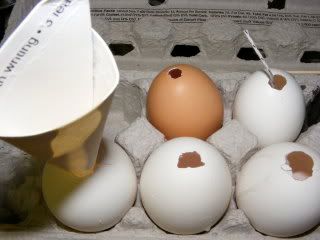
To prepare the eggshells for this project, I made a single hole in the top (narrow part) of the egg and used a short bamboo skewer to break the yolk, so it would come out easier. Then I shook the contents of the egg into a bowl, so I could use them to make French Toast. Next, the shells were rinsed out with water and set aside to dry.

Yesterday, in preparation for Earth Hour, I used the shells to make candles that Blaze and I could decorate.

I started off using the rest of the soup can of paraffin from last week's pressed flower candle and added some beeswax to it, but the candles made with the wax mixture stuck to their shells terribly. In the end, I was able to remove all the shell, but it took a lot of picking at them. The ones that I made after that, with just beeswax, peeled beautifully with no trouble at all.

For pouring the wax, I made a funnel out of thin cardboard and I placed the eggshells back in the egg carton, so they would sit upright.

Photobucket

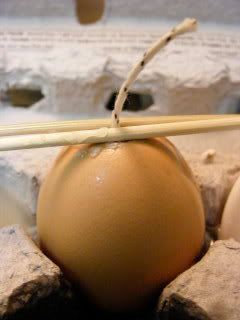
After the wax was poured, I stuck a wick in each shell and held it in place with a pair of short skewers (tooth picks would work also). I found that it was easiest to position the wick, if I dipped it in wax first, like the beginning of a "dip candle" and blew on it until it stiffened straight.

Photobucket

I set the candles in the refrigerator for a while to set-up and then peeled them like hard cooked eggs.
I have made these candles before, once when I was a teenager, and once when my girls were little, and I think it is inevitable that one egg in every bunch will have something wrong with it and not look as nice as the rest, so plan the number of eggshells accordingly.

Photobucket

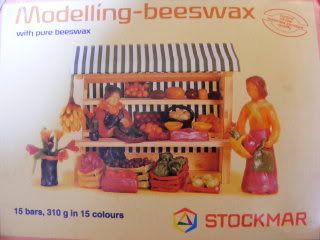
Then Blaze and I decorated the eggs with moldable beeswax.

Photobucket

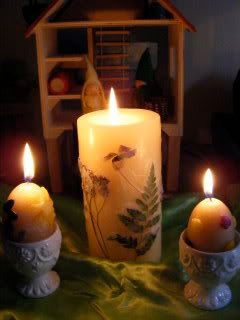
Two of the finished candles:

Photobucket

Blaze's room during Earth Hour:

Photobucket


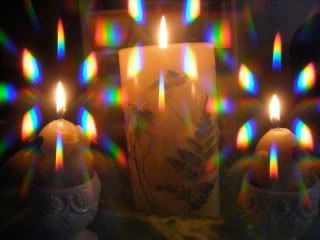
Playing with the rainbow filter again:

Photobucket

We had such an enjoyable hour without power last night, that Blaze didn't want to turn the lights back on at the end of it. We played Uno and I read aloud The Golden Egg and the next chapter of Happy Times in Noisy Village. A thunder storm started during that hour, as well, so we spent part of the time watching the rain and lightening out Blaze's bedroom window.
The storm turned out to be a really violent one, that lasted most of the night. We did need the rain, but around 2:30 I told DH that I was no longer thinking how nice it was that the garden was getting this water, and had started worrying that all our little plants would wash away into the lake across the road.
It's not raining now, but everyone else in the apartment is still asleep and I haven't been out to check on the garden yet.

Saturday, March 28, 2009

Our Little Lamb

This is what happens when I have trouble sleeping. 
My sleep-deprived mind came up with this project in the middle of the night, at the beginning of last week. Other people count sheep, I wonder if I can use them as a way of growing alfalfa sprouts.

I started by making a rather crude sheep shape out of floral wire.

Photobucket

Then I wrapped the head and legs with gray wool roving. Plain white wool for the whole sheep would work just as well, I just happened to have some gray in my bag of wool. I used a single felting needle to poke at the wool until it would stay in place.

Photobucket

Next, I filled in the sheep's body with a wad of wool stuffing and wrapped it with white wool roving. Using the needle holder full of felting needles, made felting the body much faster, although it could have been done with a single needle. I also added a little tail.

This entire construction took less than a half, after gathering up the supplies. If I was making a needle felted toy that was going to be played with, I would have spent more time on the felting, making it firmer, but since I wanted seeds to stick to the wool, I figured leaving a little fluff would help.

(Caution: Felting needles are very sharp! That's why I didn't let Blaze help me make the sheep.)

Photobucket

Our sheep was then ready to start growing its coat. I soaked the white wool thoroughly with water and then covered it with alfalfa seeds. Then I left it standing in a bowl on a sunny windowsill in Blaze's room. Every day for a week, we sprayed it with a plant mister.
I told Blaze he was probably the only city kid who was asked every day if he had watered his sheep.

Photobucket

After exactly one week it looked like this:

Photobucket

Eight days after planting, we sheared our sheep and it became part of the tuna salad sandwiches we had for dinner.

Photobucket

Blaze wants to cover the sheep with more alfalfa seeds and start over again, so that will probably be one of the things we do today.


Tonight is Earth Hour. To show that they care about the future of our planet, people all over the world will be turning out their lights from 8:30 p.m. to 9:30 p.m.

If you want to learn more, go to the following website:

http://www.earthhourus.org/

We will be turning off our lights, t.v., and computer for that hour.

Friday, March 27, 2009

Pounding Plants: Leaf Print T-Shirt

Blaze got a lot of attention yesterday, when he wore his new plant T-shirt for the fist time. I ended up explaining to several people how it was made.

To start out with, we collected leaves and used wide packing tape to attach the leaves to a plain white T-shirt, making sure that the leaves were completely covered withtape.

Photobucket

We put some newspaper inside the T-shirt to keep the plant "juices" from bleeding through to the other layer of fabric. Then we put a board on the ground outside to use as a hard surface for hammering.

Here is the fun part,
the plants must be hammered to a pulp. Don't hold back. Get out all your frustrations, because the more pulverized the plant, the better the print will be. We took turns hammering, because it took quite a bit of pounding to get a good result.

Photobucket

Next, the T-shirt was turned inside out and ironed to help set the colors in the cloth. I placed the newspaper on the ironing board to prevent any leakage from the plant getting on the ironing board cover.

Photobucket

The tape and the leaves were then peeled off, revealing the print left behind on the cloth. Some leaves worked better than others. I thought the ferns would be interesting because they have so many tiny leaves, but they did not turn out as well as the
Sweet Gum Leaf,

Photobucket

Wild Grape,
Photobucket

and Clovers.
Photobucket

The one question I was asked a couple times today was, " can you wash it without the colors coming out?" I don't know the answer to that yet, because I haven't tried, but I'll add the answer to that after it goes through it's first wash.

Update 3/28/09 10:35 p.m. - The T-shirt has now had it's first washing and it turned out fine, all the plant prints are still there. I did turn it inside out before washing, just in case, and I didn't use any bleach.


Blaze learned another new skill this week. After years of trying to get him to swing without being pushed to get started, suddenly this week, he just started doing it. He's been very proud of himself and has spent lots of time on the swing, so much time, in fact, that last night he complained that his back felt like it was still swinging long after he had stopped and come into the apartment.

Thursday, March 26, 2009

Spring Planting and Harvesting

It's been warm, sunny, and beautiful every day recently, so we've been working out in the garden quite a bit, planting new seedlings for Spring.

So far we've set out 6 Roma Tomato Plants, 6 Green Bell Peppers, 2 Japanese Eggplants, 2 Jalapeno Peppers, 6 cayenne peppers, and some herbs. There are 6 zucchini plants that still need to go in the ground, but we haven't decided where to put them yet.

Photobucket

Blaze and I also dug the fairy garden out of it's winter covering of straw and fixed it up.

Photobucket

The little gazebo in the fairy garden was something I made last year out of an old bird feeder we found, that had no floor anymore. To make a new floor for it, I filled in the empty space with polished rocks and plaster-of -paris. Then I used water proof glue to stick sheet moss all over the roof. It's held up pretty well through all kinds of weather. Just a little bit of the moss is dangling down now. The little park bench and the wooden carving came from thrift stores last summer.
Last summer we had made a path out of crushed shells, which was very pretty at first because they sparkled in the sun, but they had washed away since then, so Blaze and I repaved the path with polished rocks from the dollar store.


Photobucket

Bean plants and snow peas have started growing up the bamboo tepee


Photobucket

and we've been harvesting snow peas every day.

Photobucket

Wednesday, March 25, 2009

Johnny Applessed

Spring Break is over and we are starting our history unit about the westward expansion of the United States by learning about Johnny Appleseed, which also works well with with our new science unit about plants and trees.

Here is a cute apple snack to eat while watching the Johnny Appleseed movie, or to go into a Spring/Easter bento lunch, Usagi Ringo ( Rabbit-shaped apple slices).

Photobucket

This is such a sweet little movie:


Our read-aloud books for this week are about both subjects

Photobucket

Photobucket

Photobucket

Photobucket

We also started reading a Magic School Bus chapter book for our bedtime story

Photobucket

Blaze really loves The Magic School Bus series, so we have quite a few of these books in our book collection.

Tuesday, March 24, 2009

Egghead

Easter is coming up, so I've been thinking about egg related projects and remembered this one that we did last year.

This experiment for our unit about the human body shows how fluid around the brain helps protect it from injury.


This is a brain with no fluid around it:

Photobucket


This is a brain with fluid (in this case vegetable oil):

Photobucket


It's a pretty dramatic demonstration

Photobucket

I also saw another human body experiment that used an egg, that I want to try. One of the parents at the school where I work had soaked half of a raw egg, still in the shell, in floride tooth paste for 4 days. Then she placed the egg in a cup of vinegar for a day. The part treated with the tooth paste stayed hard, while the shell that had not been treated became soft.

Monday, March 23, 2009

Easter Egg Garland

This week's Unplugged Challenge theme at Unplug Your Kids is "long", so we made a long string of colored eggs to use as garland to decorate for Easter.
I've been saving the eggshells for 3 or 4 weeks to use to make Easter decorations. To do this, I use a sharp knife tip to make a tiny hole in the top and the bottom of the egg and then I blow the egg out of the shell. Then I wash the egg out with water and set it aside to dry.
Before beginning our garland, I dyed some of the eggshells with food coloring and a little vinegar in water. Once the dyed eggs were dry, it was time for Blaze to string them.


Photobucket

We used decorative ribbon which we taped to a bamboo skewer. Using the skewer like a sewing needle, made threading the eggshells much easier.


Photobucket


Photobucket

We tied a double knot in between each egg to keep the eggs from moving around and bumping into each other.


Photobucket

All of the eggs got strung without any being broken, although some of the holes were widened a little as the ribbon passed through.

Blaze modeling the finished product:

Photobucket

And here it is hanging above the door to Blaze's room:

Photobucket

Crafty Crow